Preface
I’ve been recently working a lot in Shiny, and I’ve constantly been stumbling across new problems. Many of them seemed interesting enough for me to want to write an article. However, in the course of the work, I found that I had too much to write about… so I decided to break it down into a series of smaller articles linked to each other.
I’ll start with something simple: creating some objects in a loop. If you think it’s too easy, wait a minute; you may be surprised! This seemingly easy task will be an excuse to understand how certain things in R and shiny work underneath, even though we ignore it daily.
Use case and naive solution
Let’s start with some simple examples. Like all simple examples, it may feel highly artificial, but at least it is not very complex. Let’s say that we want to have an app that has four numeric inputs. The first input allows the user to select an Important Number. Other inputs… well, they are not used. But we want them to have their values updated every time the Important Number is updated. And we want to have separate observers to handle them (yes, I know that one observer would work here as well… but I told you this might feel artificial!). Their values are calculated via some calculations which are entirely irrelevant right now.
library(shiny)
# side note: all functions which are not prepended with scope operator
# are either from base R or from the `shiny` package

do_calculations <- function(important, other) {
  # this is totally random
  (important * other * 2^5 + important - 7 * other) %% 101
}

ui <- fluidPage(
  numericInput("important", "Select important number",
               min = 0, max = 100, value = 42),
  numericInput("var_1", "Select input 1",
               min = 0, max = 100, value = 0),
  numericInput("var_2", "Select input 2",
               min = 0, max = 100, value = 0),
  numericInput("var_3", "Select input 3",
               min = 0, max = 100, value = 0)
)

server <- function(input, output, session) {
  observe({
    updateSliderInput(
      session = session,
      inputId = "var_1",
      value = do_calculations(input[["important"]], 1)
    )
  })

  observe({
    updateSliderInput(
      session = session,
      inputId = "var_2",
      value = do_calculations(input[["important"]], 2)
    )
  })

  observe({
    updateSliderInput(
      session = session,
      inputId = "var_3",
      value = do_calculations(input[["important"]], 3)
    )
  })
}

shinyApp(ui, server)
Simple version of the app.
It works like a charm! But we can easily see that there is a lot of copypasting. And copypasting is something we should avoid. (Some other day, I would love to say something more about it in general.) If you have gone so far into the article, you probably know what I want to do: a loop. There are two prominent places to use it – in UI and server. UI first, since it seems more manageable. We are R users, so we should make real loops only when there are no other means. Thus we are using good old lapply, as it is even simpler than trying to use for.
ui <- fluidPage(
  numericInput("important", "Select important number",
               min = 0, max = 100, value = 42),
  lapply(1:3, function(i) {
    numericInput(inputId = paste0("var_", i), paste0("Select input ", i),
                 min = 0, max = 100, value = 0)
  })
)
Okay, this is simple, indeed. It works as it did without the loop; you can check on your own if you don’t believe me.
Now it’s time for the server. Here we are calling observer mainly for its side effect (i.e. registration of observers), so the for loop might be more appropriate.
server <- function(input, output, session) {
  for (i in 1:3) {
    observe({
      updateSliderInput(
        session = session,
        inputId = paste0("var_", i),
        value = do_calculations(input[["important"]], i)
      )
    })
  }
}
And now – something strange happens! Only the last of the observers works as expected; others seem off. If you know at first glance what happens there – congrats; you are good at R and Shiny. If you don’t know, then we need to understand what environments are relevant for Shiny.
A quick recap of environments
Each R expression is evaluated in some environment. An environment can be considered a list of names with associated values. There are, however, some differences, of which two are the most important:
Firstly, each environment contains a reference to its parent, so they create a tree-like structure. One exception to this rule is the empty environment which does not have a parent and serves as the root of the whole hierarchy.
Secondly, environments are mutable. If you pass an environment to a function and mutate some objects inside, the values in the environments are also changed for the external viewer.
Every time we create an object in R and assign its value to some time, we bind this object within some environment. Calls from the console or scripts at the top-level assign objects to the global environment. Creating variables inside a function assigns them to an execution environment. Each package also has its environment, where all its functions and objects are available.
When we want to access some variable, it is first sought in the evaluation environment, i.e. the environment where this call is performed. If no object of this name is found, it is sought down the search path: in the parent environment of the calling env, then in the parent of the parent, etc., down to the empty env. At the start of the R session, base packages are inserted into this hierarchy, so those objects are accessible from the global environment. Additionally, every time we use library, the environment of the loaded package is inserted into the path. That explains why we have access to all the functions and objects from the console. That also explains why objects in the global environment are visible from within the function called in the global environment.
One more thing worth mentioning – in R, we can manage the time of evaluation of the code. If a function is provided with an expression, there are means to suspend the evaluation of its arguments. Then we can modify it or evaluate it later.
I won’t go into the details of how to do it right now (but don’t worry, I like the topic too much not to tell more about it). If you want to get new knowledge or refresh the one that you’ve got, you can see a chapter in Advanced R by Hadley Wickham
Environments in Shiny
Environments are super crazy functional. The fact that they exist does Shiny work at all. And they are also the reason why our for loop did not work. That is, of course, only a part of the whole picture, but such complicated topics are easier to swallow in smaller bits.
We need to focus on what happens when the app starts (e.g. when function shinyApp(ui, server) is called). Somewhere in the guts of Shiny, the server function is called. Just as with any other function, it has its execution environment. This environment is provided with input and output lists of reactive values; it also has the global environment as its ancestor (and therefore, it has access to any loaded packages). When the code inside this function is executed, objects specified by the user are created. Significantly, all reactive objects are made, and the user can modify input and output reactive values. Also, our objects of focus – observers – are registered.
The most crucial point is: when the server function is executed, and R stumbles upon the observer call, it does not evaluate the code passed as the first argument. Instead, it registers the observer and stores the code for later evaluation. We are still at the start-up stage, and now Shiny only creates net reactive dependencies. No inputs are available; they appear just after somebody opens the browser and initializes the page. That also applies to all expressions enclosed in reactive’s, render’s, etc., but we skip them in the other part as they do not appear in our example.
Now goes the neat part: during the application runtime, code provided to observer is evaluated as is in the server function execution environment. So, when seeking a variable, it looks for its value in this environment. It does not magically replace the i variable with the value used in the loop iteration, as might be expected. I made a diagram (included below) which illustrates how it does not work.
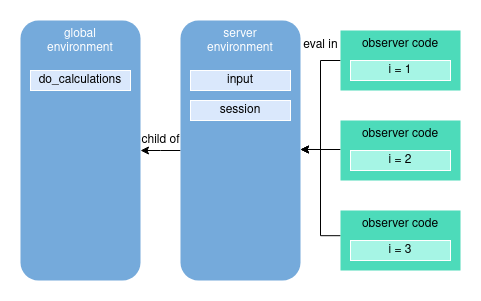
Expected situation
Stating it once again: every time the observer is called, i is being sought in the current or enclosing environments. But that introduces the question: shouldn’t that mean that i is missing and calling i raises an error? Why does it work for one of the observers? The answer is: actually, all three observers work. But they all modify the input number 3. And that is because of one quite peculiar property of R. Namely, the variable used to iterate is not destroyed after finishing the loop execution, and it stays in the environment with the value of the last value used in the loop. In our case, i exists in the server environment and has the value 3. See the diagram below.
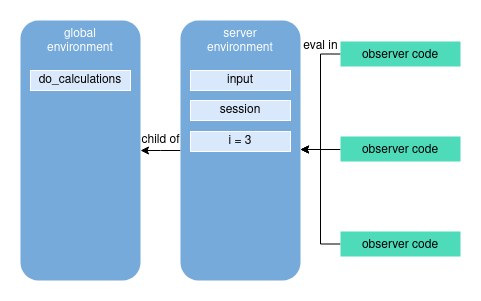
Actual situation
As a side note, I want to add that there is also the topic of visibility of Shiny objects between users’ sessions. It is covered by an article on the official Shiny webpage. I strongly recommend reading it.
Since we already know what happens, we must learn how to get around it. There are at least a few solutions.
Solution 1: Create an environment for each observer
I told you that the code in observers etc., is evaluated in the server environment. It is true by default. There are ways of changing it, even straightforward ways. observer function has a parameter env, which allows us to set the evaluation environment.
for (i in 1:3) {
  env <- new.env()
  env[["i"]] <- i

  observe({
    updateSliderInput(
      session = session,
      inputId = paste0("var_", i),
      value = do_calculations(input[["important"]], i)
    )
  }, env = env)
}
In each loop iteration, we create a new environment whose parent is the server environment. Then we assign the current value of the i to the environment and provide the env as a parameter for the observer. As a result, each observer has its environment with its own i object. Those envs refer to server env as a parent, so all other variables are accessible. The trick is possible because those numerous envs are not used inside the observers’ quoted code; they are kept together with code. The concept is illustrated in the diagram below.
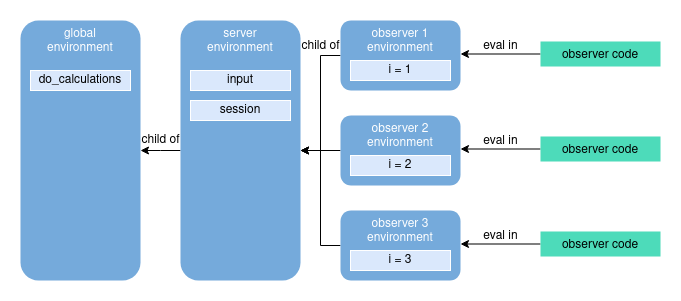
Solution with the creation of environments
We can also do the same with a small change. new.env() call can be replaced with rlang::env(). rlang is a package that overhauls the interface of operating on expressions and environments in R, as base R ways of doing it are messy. A minor change, but on this blog, we will demonstrate rlang features heavily, so you should get used to it. Additional source is the project webpage.
Solution 2: Inject the constants
Speaking of rlang… The second solution employs rlang’s features and does something very clever: it replaces a variable with a constant.
for (i in 1:3) {
  rlang::inject({
    observe({
      updateSliderInput(
        session = session,
        inputId = paste0("var_", !!i),
        value = do_calculations(input[["important"]], !!i)
      )
    })
  })
}
Beautiful, isn’t it? This code looks almost the same as the code from the not-working approach of simple iteration. The first difference is prepending i variable appearances with the !! symbol (bang-bang, as ones say, or more professionally: unquotation symbol). The second is wrapping the whole observer with the rlang::inject function. This function replaces everything prepended by an unquotation symbol with the value of the symbol. That operates on the level of expression. Before observer is called, both appearances of i are replaced with the current value of i. Only after that the observer is called, and modified code is saved instead. You have to admit: this is elegant. It also makes the code work as we expected the original code to work, that is, without creating additional environments.
This solution is possible with base R, but the code is significantly less appealing and easy to understand, so we will only stick to it.
Solution 3 (or solution suggestion): Utilize Shiny modules
Finally, there is one more solution. If you are already familiar with shiny modules then it should be clear that you can use them. I will not provide the code yet, mainly because it seems to me that many things have already happened today. But don’t worry – I have a lot to say about the modules too. We will come back to it. Those that know how they work can write code using modules as homework. Those that do not know should read some introduction to shiny modules.
Summary
When environments and modification of expressions come into play, even as simple as loops may get complicated, I wanted to show you that coming across them in R (especially in Shiny) is easy. Without a slightly more profound understanding of it, they might seem illogical and not rarely impossible to overcome. Having the additional knowledge and ability to use such tools as rlang might allow you to make your code better and cleaner. And sometimes working at all.